
Use SwiftUI Previews and the Simulator
Choose the right feedback loop
A preview helps you inspect a view while editing. A simulator runs the built app. A real iPhone verifies behavior on hardware. Learn which result each tool establishes before relying on a screenshot.
Use the HelloWorld project from the earlier lessons. This lesson keeps its source and greeting unchanged.
Declare the view to preview
The last declaration in the built file creates a preview of ContentView. It supports the canvas; the app still starts through its @main App type.
ContentView.swift · complete built source file
import SwiftUI

struct ContentView: View {
    var body: some View {
        VStack {
            Image(systemName: "globe")
                .imageScale(.large)
                .foregroundStyle(.tint)
            Text("Hello, world!")
        }
        .padding()
    }
}

#Preview {
    ContentView()
}
Open ContentView.swift and enable the Canvas using the editor toolbar or the Editor menu. The preview declaration is not a separate source file and does not require a second app target.
Recognize a paused canvas
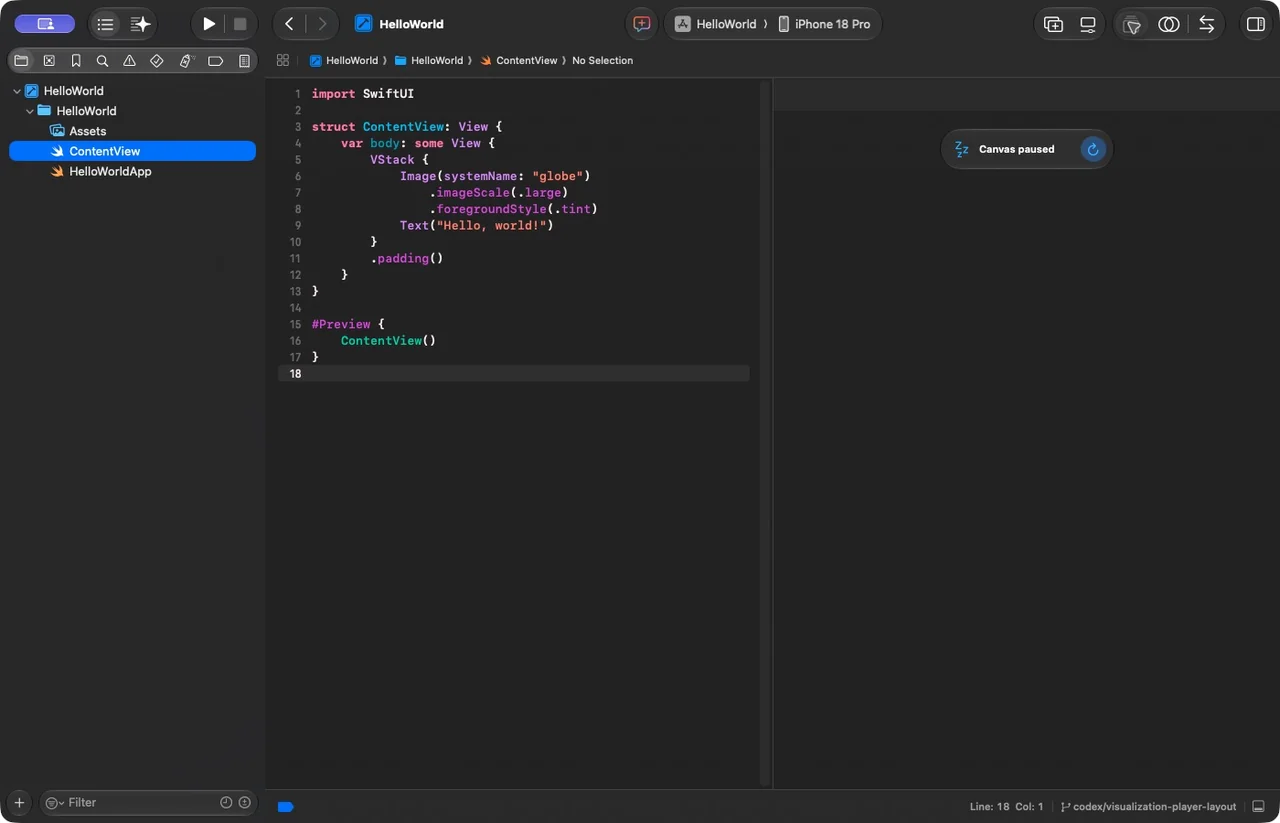
During preparation, Xcode displayed Canvas paused. A paused canvas is not evidence that the app has a compiler error. Use the refresh control, allow Xcode to prepare its preview environment and inspect any resulting diagnostic.
Do not claim the preview rendered merely because the canvas is visible. The capture below records the paused state we actually observed.
Run the entire app in Simulator
Select a concrete installed iPhone simulator in the run-destination selector and press Command-R. Wait for build and launch. The app process should show the globe and Hello, world! greeting.
Changing a preview configuration does not necessarily change the run destination. Check the toolbar before running. The Simulator app can be opened separately when Xcode launches the app without bringing its window forward.

Know what each check proves
Use the canvas for quick visual iteration, the simulator for repeatable app flows and real hardware for device-specific behavior. A preview does not prove installation, provisioning, background execution or hardware access. A simulator screenshot does not establish physical performance.
If no compatible runtime is installed, add one through Xcode Settings → Components. Match the app deployment target to an available destination. If a preview fails, read its first diagnostic and try a normal app build to separate source failures from preview-environment failures.
Choose the smallest trustworthy feedback loop
You are adjusting a text style. A working preview is a useful quick check because it can construct the view without following the app’s complete launch flow. You are testing installation or scene startup. Run the app, because a preview does not establish those behaviors. You are checking a hardware-dependent feature. Use a suitable physical device and the relevant permissions.
When a preview is paused
First distinguish paused from failed. Resume or refresh a paused canvas and wait for its environment to prepare. If it reports a source error, build normally and inspect the first diagnostic. If a normal build succeeds while preview preparation fails, preserve that distinction and inspect the preview’s own diagnostic instead of repeatedly rewriting working view code.
The paused screenshot in this lesson is an observed intermediate state. The simulator screenshot is separate proof of a launched app. Neither establishes that the other environment was successfully running.
A comparison worth doing
Use the same view with a short and a long label in previews, then launch the actual app baseline. A preview fixture can reveal wrapping without changing the app’s default data. If you accidentally edit only a preview fixture, the launched app will not gain that edit. Locate where each instance receives its input before diagnosing “Xcode did not save my change.”
Practice comparing the two tools
Find #Preview in ContentView.swift, enable the canvas, then run the app in the simulator. Identify which window contains the running application.
Worked answer
The canvas belongs to the Xcode editor. The running simulator is an independent app window with an iPhone environment. Both can display ContentView, but they have different startup paths. Our verified result here is the simulator output; the paused-canvas image documents a real intermediate state.
Check your understanding
Choose the explanation that matches this example.
Use evidence from the right environment
You can identify a paused canvas, locate the preview declaration and verify a simulator launch. Next, learn to investigate a build error.
Reaching the recap and completing the quizzes are separate milestones.