
Hello World iOS Application
Build and understand Hello World
A Hello World app is a small complete program with a visible result. In this lesson you will connect its app entry point to a SwiftUI view, read the complete source and learn how to change its greeting.
Complete Getting Started first, or download the supplied project. Use an installed simulator matching the project deployment target.
Verified with Xcode 27.0 · Build version 27A266a, iPhone 18 Pro (simulator), iOS 27.0. Screenshots may differ from another Xcode release or device. The published foundations lessons are the beginning of this course.
Download the verified HelloWorld Xcode project. Unzip it and open HelloWorld.xcodeproj. The sample contains its Swift files and assets; build products and personal Xcode settings are excluded.
Find the two Swift files
In the Project navigator, open HelloWorldApp.swift and ContentView.swift. The first declares the app entry point; the second describes the interface shown by that app. Assets.xcassets is the asset catalog for resources such as colors and app icons.
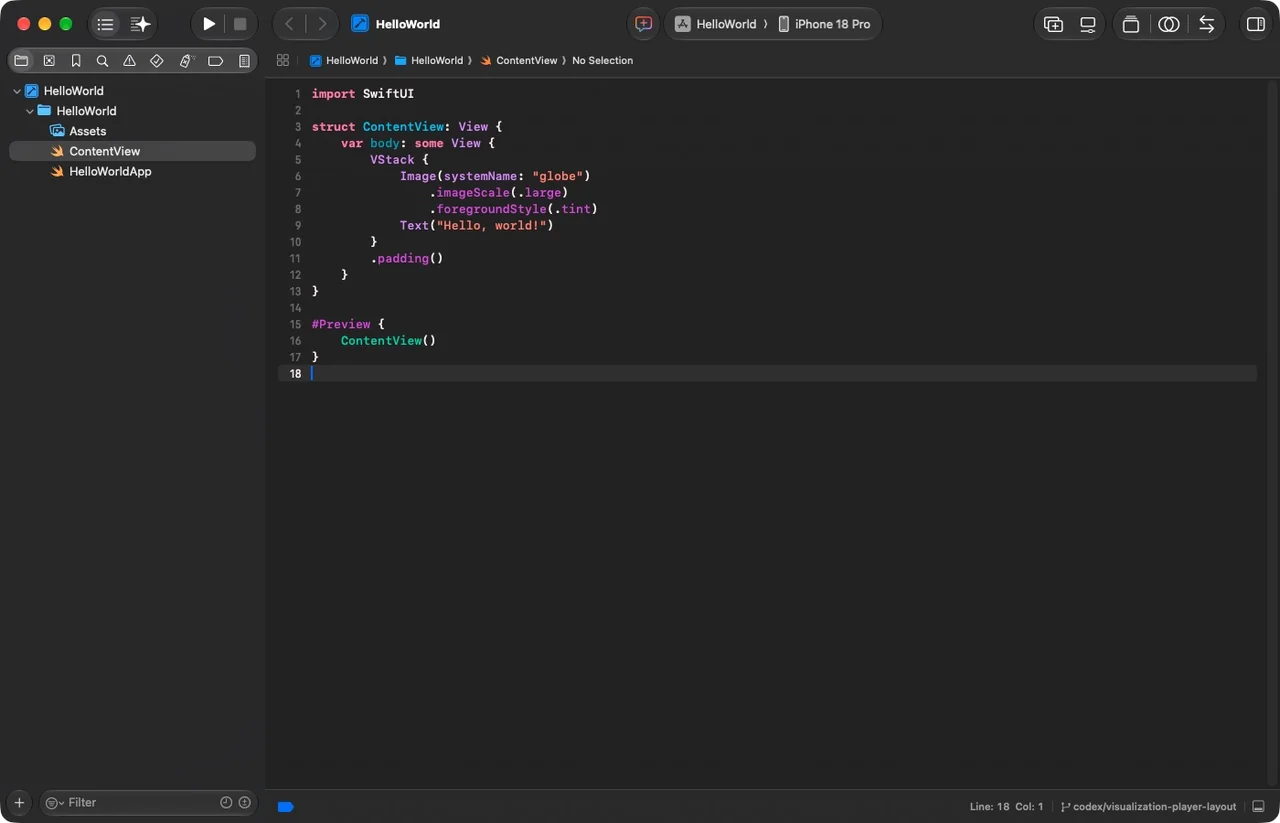
The screenshots show actual Xcode source. The code blocks below are extracted from the same sample files used by the verified build, so you can copy the code directly.
Start the app with @main
HelloWorldApp.swift · complete file
import SwiftUI

@main
struct HelloWorldApp: App {
    var body: some Scene {
        WindowGroup {
            ContentView()
        }
    }
}
import SwiftUI makes SwiftUI types available. @main identifies the app entry point. HelloWorldApp conforms to the App protocol.
Its body describes a scene. WindowGroup supplies the window scene, whose initial interface is ContentView(). Here some Scene means the property returns a specific scene type without spelling that full type in the declaration.
Describe the screen with a View
ContentView.swift · complete file
import SwiftUI

struct ContentView: View {
    var body: some View {
        VStack {
            Image(systemName: "globe")
                .imageScale(.large)
                .foregroundStyle(.tint)
            Text("Hello, world!")
        }
        .padding()
    }
}

#Preview {
    ContentView()
}
ContentView conforms to View. Its body returns the interface. VStack arranges the image and text vertically. The system symbol named globe is the image; Text("Hello, world!") supplies the greeting.
The chained calls are modifiers: imageScale(.large) scales the symbol, foregroundStyle(.tint) applies the tint style, and padding() gives the stack space around its content. #Preview provides an Xcode canvas preview; it is not the app’s entry point.
Build, launch and check the result
Save the files, select the HelloWorld scheme and a compatible iPhone simulator, then press Command-R. After the build succeeds, inspect the running app. You should see one globe and the greeting Hello, world!.
The screenshot below came from the built app. During preparation, local image analysis confirmed that the expected greeting was visible. Compilation alone would not have confirmed that the correct screen launched.

Trace the interface from entry point to pixels
Start at @main rather than at #Preview. The App type supplies a scene through WindowGroup; the scene constructs ContentView; ContentView.body describes a VStack with an Image and Text. This is a tree of descriptions, not a script that manually paints a globe and then permanently appends a label.
WindowGroup {
    ContentView()
}
// ContentView.body contains the visible interface.
// #Preview constructs a separate editor preview.
Now predict two independent edits. Replacing the greeting string changes the text value. Replacing VStack with HStack changes the relationship between the globe and greeting: they become side by side. Neither requires changing the bundle identifier or the organization name. Restore the supplied VStack after the experiment.
Why is body a property?
body computes a view description. SwiftUI may evaluate it again as relevant inputs change. Avoid starting downloads, writing files or relying on exactly-once print calls inside body. Later lessons add state and lifecycle work deliberately; the first app keeps body free of those effects.
Explain an error before fixing it
Remove a closing parenthesis from a local exercise copy and build. The parser can no longer identify the intended expression; later diagnostics may point at consequences rather than the first missing delimiter. Restore the parenthesis and rebuild. A visible preview of an older valid version does not override a current compiler failure.
Change the greeting yourself
In ContentView.swift, change only the greeting to your name or the text below. Save and run again.
Text("Hello, ProgramGuru!")Expected result: the label changes to Hello, ProgramGuru!; the globe remains above it. Keep the surrounding VStack and modifiers. Restore the original text when you want to match the supplied screenshots.
Worked answer
The text inside the quotation marks is a Swift string literal. Editing that literal changes the value passed to Text; you do not need to rename the view, app struct or bundle identifier. The supplied verified project and screenshot use the original greeting.
An issue we encountered: an external file change
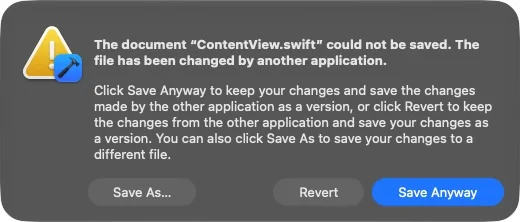
While preparing this tutorial, the source was edited on disk while Xcode also held an editor copy. Xcode displayed “The file has been changed by another application.” This can also happen if you edit a file in two editors.
Compare the versions before choosing. Revert keeps the version on disk and reloads it. Save Anyway keeps the editor’s version; Xcode’s warning explains that the other changes are saved as a version. Save As lets you keep a separate copy. Do not blindly overwrite changes you need.
We confirmed the intended source, resolved the warning, and built the saved project successfully. If a run still shows old text, check that you saved the file in the project actually selected in Xcode.
Check the connection from app to screen
Where does this app choose its first interface?
What you built
You followed the chain @main → WindowGroup → ContentView → VStack → Image and Text. You can now identify the app entry point, read a small SwiftUI view and change a visible label.
Before moving on, confirm that the project builds and that the simulator shows your intended greeting. Later lessons will add layouts, state and interaction; these first two lessons establish the working app and development workflow.
Further reading: Apple: Hello, SwiftUI and Xcode.
Reaching the recap and completing the quizzes are separate milestones.