
Getting Started with iOS Development
Your first iOS development setup
You will create a small iPhone app using SwiftUI, choose a simulator, and run the app from Xcode. You do not need a connected iPhone for this exercise. Basic familiarity with files and typing code is enough; use the Swift course alongside these app lessons if the language is new.
Verified with Xcode 27.0 · Build version 27A266a, iPhone 18 Pro (simulator), iOS 27.0. Screenshots may differ from another Xcode release or device. The published foundations lessons are the beginning of this course.
Understand the tools before starting
Swift is the language. SwiftUI describes the interface. Xcode edits and builds the project. The iOS Simulator runs the built app on your Mac.
Install Xcode from Apple and launch it to finish its required setup. In Xcode Settings, install an iOS simulator runtime under Components if none is available. Names can vary by release. Leave adequate disk space for Xcode, runtimes and build caches; a first build may take several minutes.
This sample was created with Xcode 27 and targets iOS 27. Use a compatible installed runtime, or deliberately adjust the deployment target when adapting it to an older toolchain. A paid developer membership is not required for this simulator exercise.
Choose the iOS App template
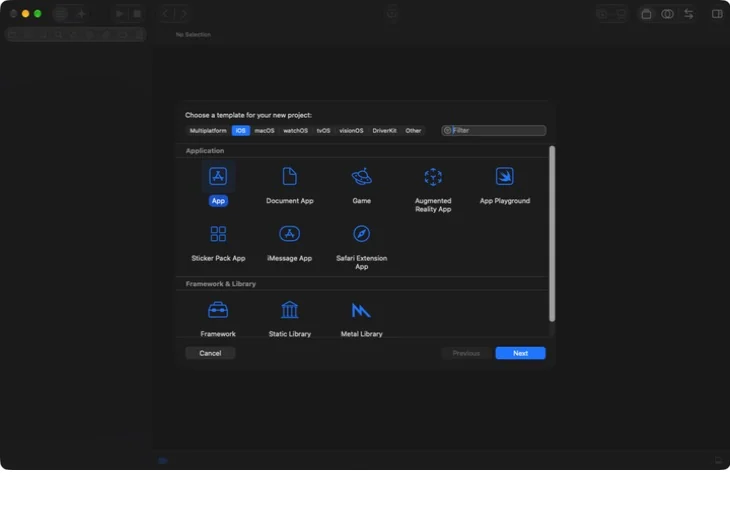
In Xcode choose File → New → Project. If Xcode shows a quick project menu, choose Choose Template. Select the iOS platform and the App template, then continue.
Do not choose a command-line tool for this lesson: the goal is an app with an iPhone interface.
Set the project options
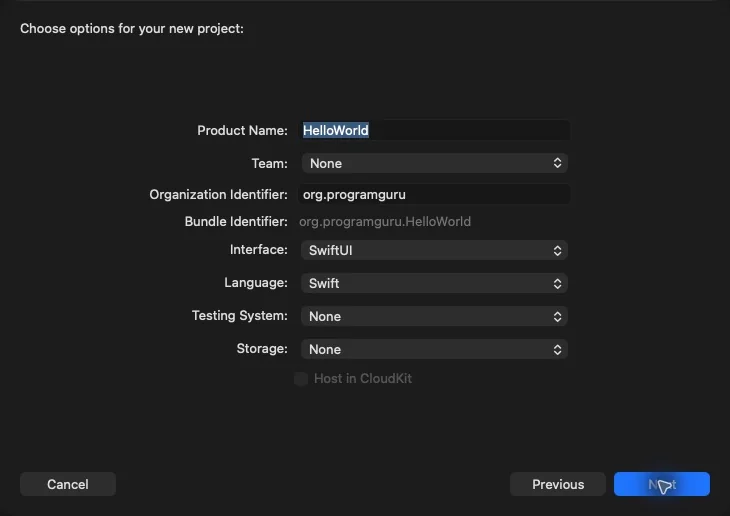
Use HelloWorld for Product Name, SwiftUI for Interface, and Swift for Language. Set Storage and Testing System to None for this small first project. We will introduce persistence and automated app tests in later lessons.
For this simulator example, Team is None. Use an organization identifier such as org.programguru; Xcode combines it with the product name to form the bundle identifier org.programguru.HelloWorld. Your own projects should use an identifier appropriate to you.
Continue, choose a local folder and create the project. Source control is useful, but creating a Git repository is optional for this lesson.
Select an iPhone simulator and run
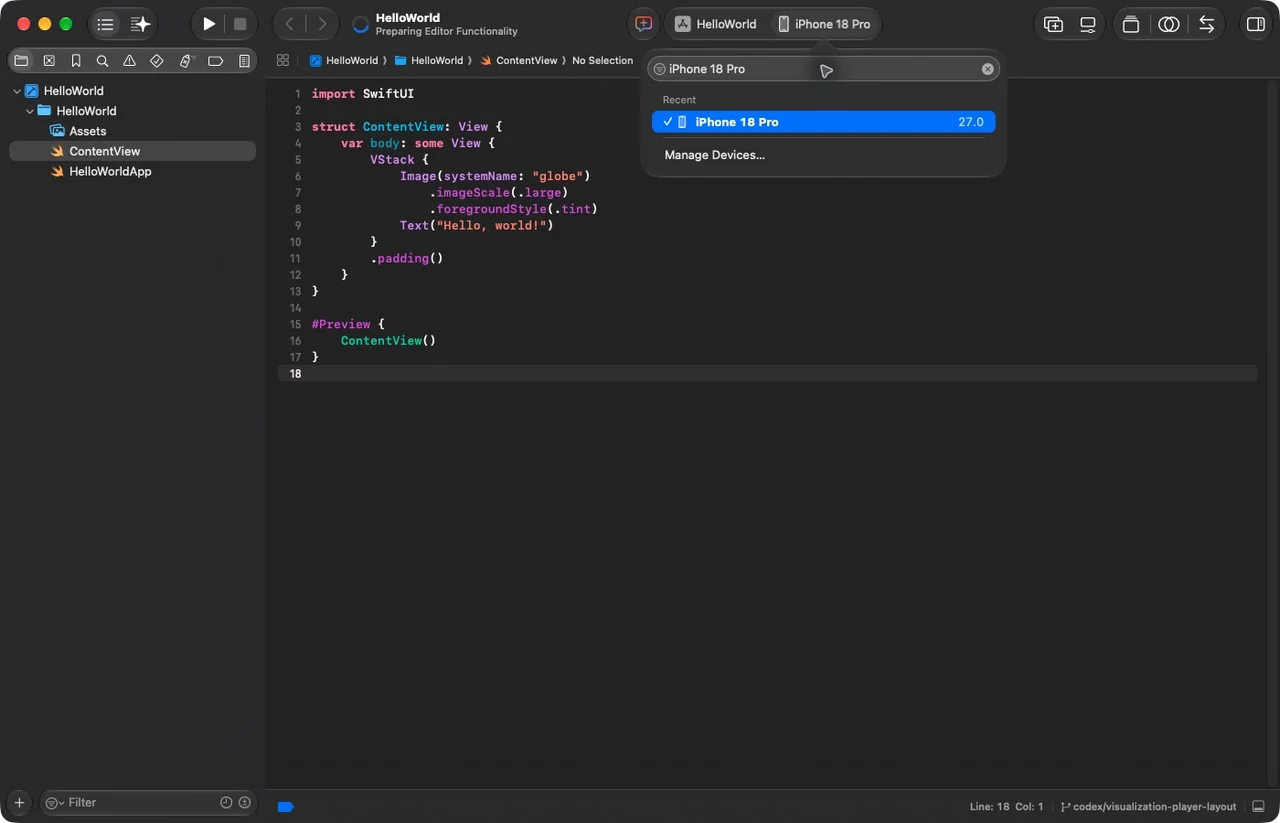
Use the run-destination selector beside the scheme in the top toolbar. Select an installed iPhone simulator; this capture uses iPhone 18 Pro with iOS 27. You can filter the list by its name.
Press Command-R or the Run triangle. Xcode compiles the Swift source, builds the app and launches it. Wait for the first build and simulator startup. A generic “Any iOS Device” destination is for building rather than launching a specific simulator.
Confirm the app is running
The simulator should display a globe above Hello, world!. This is the standard SwiftUI starter interface in the created sample. Its presence confirms that the project built, installed and launched.
The canvas preview inside Xcode is useful, but it is a different view of your app. For this check, look at the running simulator. Open Window → Devices and Simulators or the Simulator app if its window is not visible.
Download the verified HelloWorld Xcode project. Unzip it and open HelloWorld.xcodeproj. The sample contains its Swift files and assets; build products and personal Xcode settings are excluded.

If the first run fails
No simulator destinations: install a compatible iOS runtime in Xcode Settings → Components. A deployment target newer than the installed runtime cannot run there.
A signing team is requested: confirm that the selected destination is a simulator. A real iPhone has a separate signing and device-trust setup; do not change account settings just to finish this simulator lesson.
Slow first build: allow Xcode to prepare SDK caches and watch the build status. This happened during preparation of these lessons. Later builds can reuse that work.
Build error: open the Issue navigator and read the first relevant error. Fix the source or configuration before repeatedly trying to launch. A successful build and a visible app are separate checks.
Check your understanding
Which environment is sufficient for running this first example?
Understand one complete edit-build-run cycle
Your first goal is a repeatable feedback loop, not merely an Xcode window with a project name. Open ContentView.swift, locate the string passed to Text and change it to Welcome to my first app. Save the file. Select the app scheme and a concrete simulator destination, then run. Watch for three different observations: the build finishes successfully, the simulator launches the app, and the screen displays your edited text.
Why separate these observations? A successful build can be followed by a launch failure. An app can launch from a different scheme. A preview can display edited content while the previously installed app still shows an older build. Keeping those facts separate gives you a useful diagnosis instead of repeated retries.
Trace a result back to the correct source
If the screen still says Hello, world!, inspect the project location in the navigator and the selected scheme before deleting caches. If compilation failed, read the first issue and keep its file and line number. If launch failed, inspect the destination and launch message. Source errors, destination errors and a stale editor are different causes that need different fixes.
Practice the workflow, not just the edit
Make a second small change and predict the screen before running. Then restore the original greeting to match the supplied screenshots. You should be able to explain which action compiled code, which started the process and which observation verified your intended output. That explanation is the foundation for every later tutorial.
Ready to read the app code
You created an iOS App project with SwiftUI, selected a simulator and verified the running starter screen. Next, follow Hello World iOS Application to understand the app entry point, interface code and a first modification.
Further reading: Apple: Hello, SwiftUI and Xcode.
Reaching the recap and completing the quizzes are separate milestones.